Loading...
Loading...
Loading...
Loading...
Loading...
Loading...
Loading...
Loading...
Loading...
Loading...
Loading...
Loading...
Loading...
Loading...
Loading...
Loading...
From time to time you might find that your enterprise receives more orders than you can physically process (for example at Christmas or in the case of staff illness/storm damage).
It is always better to know the limits of your business and shut your order cycle early than over sell and then have to let people down.
Products will disappear from your shop front when their stock levels move to zero, but there may be a limit to the number of orders you can pack and deliver in the time frame of your shipping methods and this is not accounted for purely by stock (processing 100 orders, each containing one item will take longer than one order of 100 items).
Change the end date and time of an order cycle to the current time will mean customers in the process of checking out will not receive their orders.
Therefore we recommend the following method- this way customers who are paying at the time will still have their orders accepted but no others will be taken.
Your enterprise can process 100 orders a week- this is a the absolute max.
Your listing orders page shows that you have received 95 orders in this order cycle and there are still 2 more days for it to run.
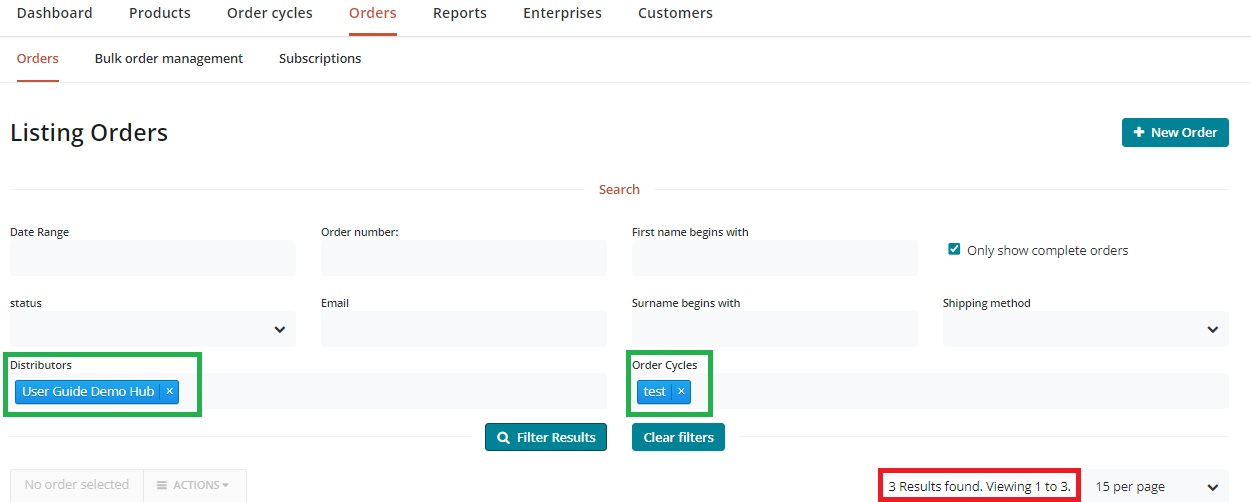
Visit Orders in your admin panel and filter results by distributor and order cycle (highlighted in green below). The number of orders received is shown under the 'Filter Results' heading (highlighted in red).
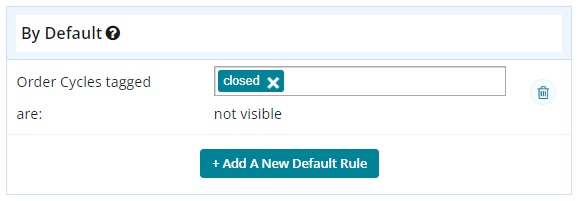
Add a new default tag rule by visiting Enterprises -> Settings -> Tag Rules. Default: Order cycles tagged 'Closed' are not visible.
No other tag rules are necessary.
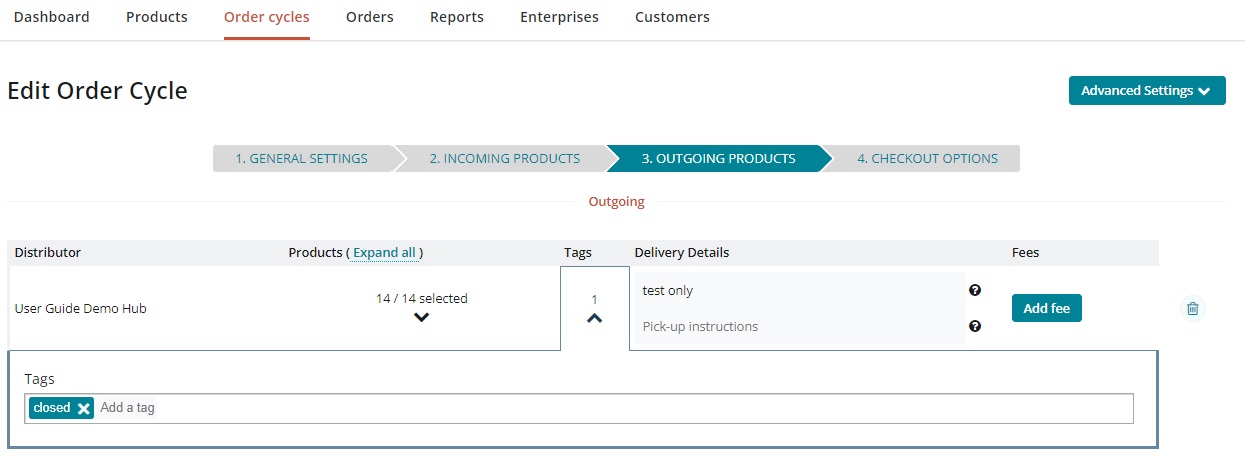
Edit the order cycle which is open currently and on page 3 ('Outgoing Products') add the tag 'Closed'
Update and your order cycle will close without disrupting customers in the process of checking out.
This process is only possible at the moment for enterprises which are registered as hubs.
Although this feature is not-yet built into OFN, with a few quick steps it is possible to allow customers to pay with prepaid credit on OFN. In a nutshell, this involves first creating a credit product that the customer checks out with. The store manager will then go into the backoffice and ‘delete’ this product putting ‘credit’ on the customer account. Future orders can then be ‘paid’ with the credit on the account.
First create a credit product in the backend. When creating the product in the backend also create a variant named ‘Place Holder credit’ variant for $0 and with ‘0’ for ‘on hand’ available. It will come in handy later in the backend order admin. Then add all the variants to an order cycle to sell the prepaid credit to your customers.
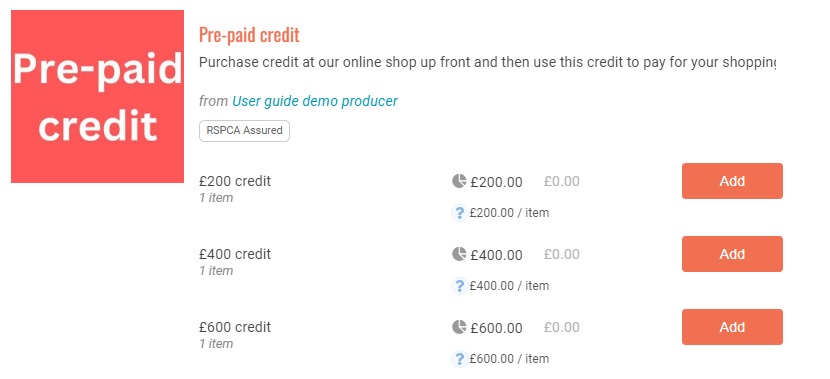
Here is an example credit product in the storefront that the customer can choose to add ‘credit’ to their account.
Instruct the customer to choose the amount of credit they want to apply to their account and check out their order. Make sure they ‘save’ their account info by choosing ‘LOGIN’ when checking out and creating an account with a password.
Now in the backend you will have their order with the amount of credit they are purchasing.
Once they have paid the order you can ‘capture’ the payment by using the green checkmark.
Then you need to go in and ‘edit’ the order, but first you will have to add ‘on hand’ to the ‘place holder credit’ product. Add the amount of ‘on hand’ equal to the number of credit orders you are processing at that time (i.e. you have 1 credit orders, add ‘1’ as ‘on hand’ to the ‘place holder credit’ variant and SAVE CHANGES).
Now you can go back to your order list and choose to ‘edit’ the credit order.
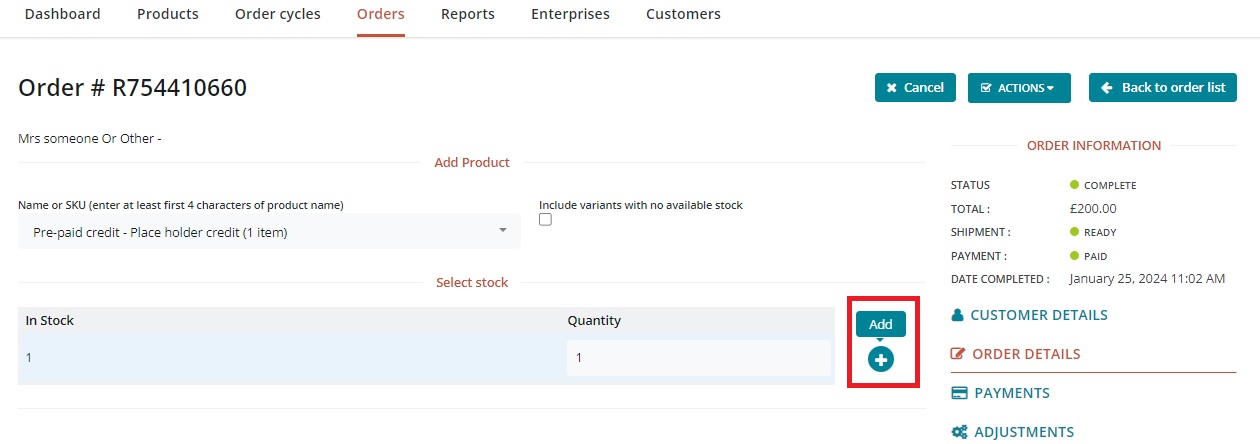
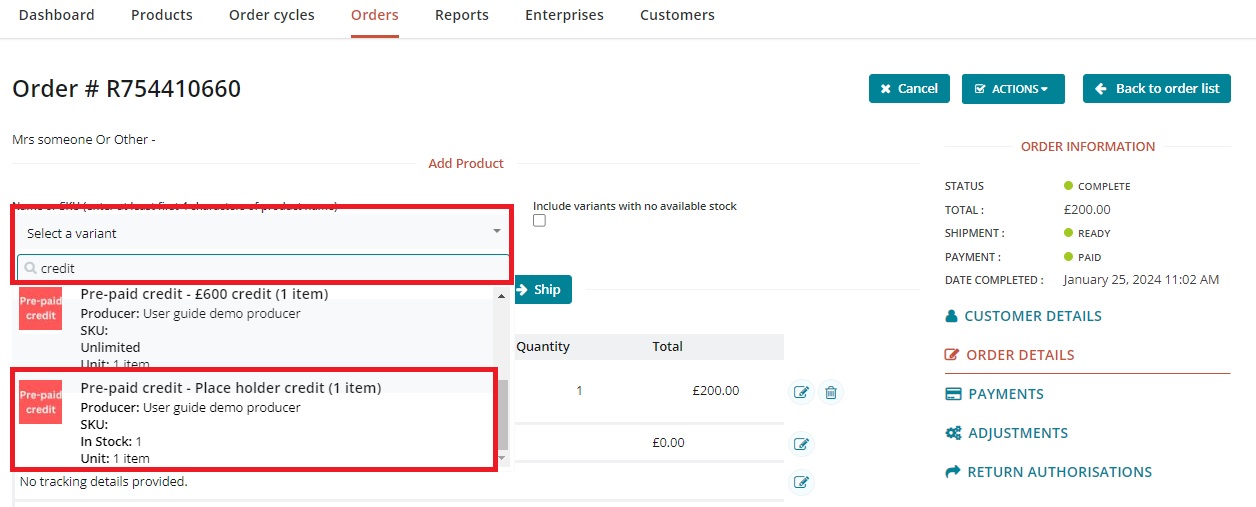
First you will need to add the ‘Place Holder credit’ to the order.
Now you can delete the other ‘credit’ product from the order (adding the ‘place holder credit’ variant first prevents the entire order from being canceled; that step would be unnecessary if the order already contained other products).
Now in your orders list the payment state for the order will revert to ‘credit owed’ for the amount of the prepaid credit.
It will also look like this in your customer list under the Customers tab for that customer.
And if you do a Order Cycle Management - Delivery Report, it will show a positive balance for the customer.
And if the customer logins to their account on OFN and goes to Transactions they will see a running balance of their account with you.
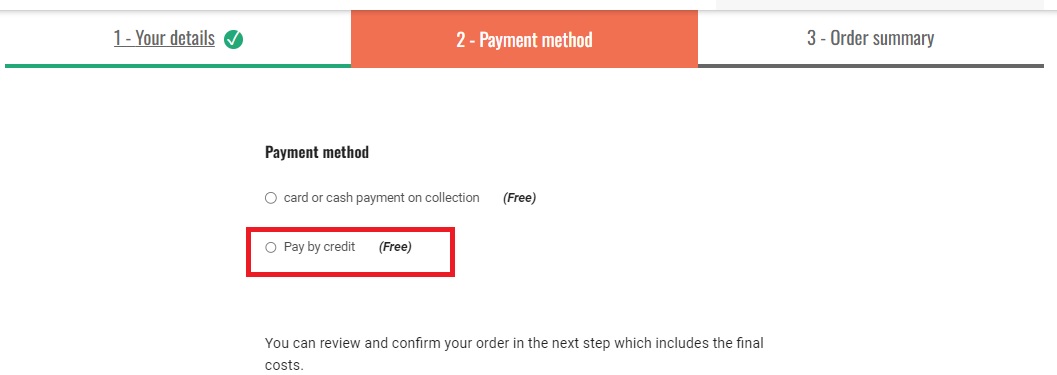
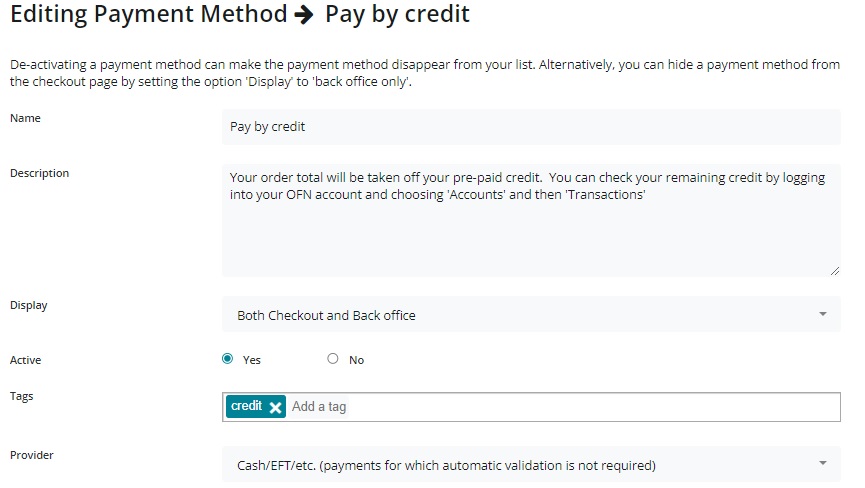
To apply the credit to future orders you will need to create a payment option - ‘pay by credit’ that customers can choose when they checkout to indicate they want you to use their credits.
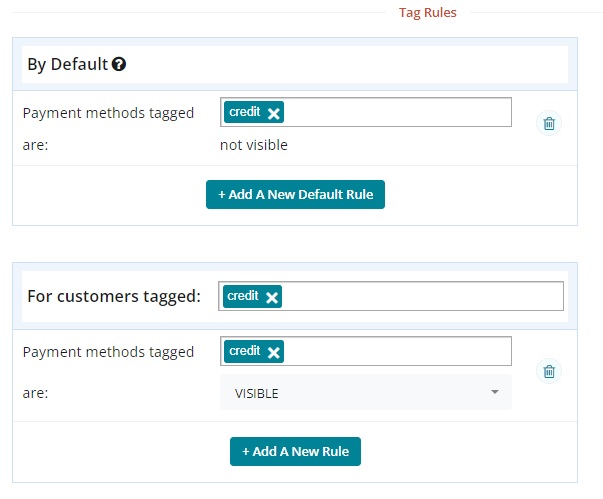
You can use tags if you want this payment option only available/visible to those customers that have purchased prepaid credit with you. Add the appropriate tag to the customer's account:
And set up the following tag rules:
Make sure you add the new payment method to page 4 of your order cycles ('Checkout options') when you set up a new order cycle.
This is what the customer will see when they checkout.
Once the customer has placed a 2nd order it will appear in your Orders list with a Balance Due.
This is what they will see if they login to their account. The negative amount means their remaining credit balance.
And this is what you will see if you as a manager from your customer list.
And if you run the Delivery Report.
IF you want to mark the new order as ‘Paid’ changing the payment state from ‘Balance Due’ to ‘Paid’, you can click the green check mark to the right of the order. (Note: You may first want to check your customer list to ensure the customer has enough ‘credit owed’ to cover the order cost. If they don’t you can make a partial payment on the order with the ‘credit owed’ amount remaining and then send them an invoice for the balance on the order.)
Now the payment state of the order is 'paid' in your orders list.
But in the customer record and in your customer list the running balance will revert back to the full prepaid credit amount.
To credit the payment on the 2nd order to the running balance of credit we must now go into that original credit order and make a negative payment in the amount of the 2nd order (i.e. - £5.70).
First Edit the original credit order.
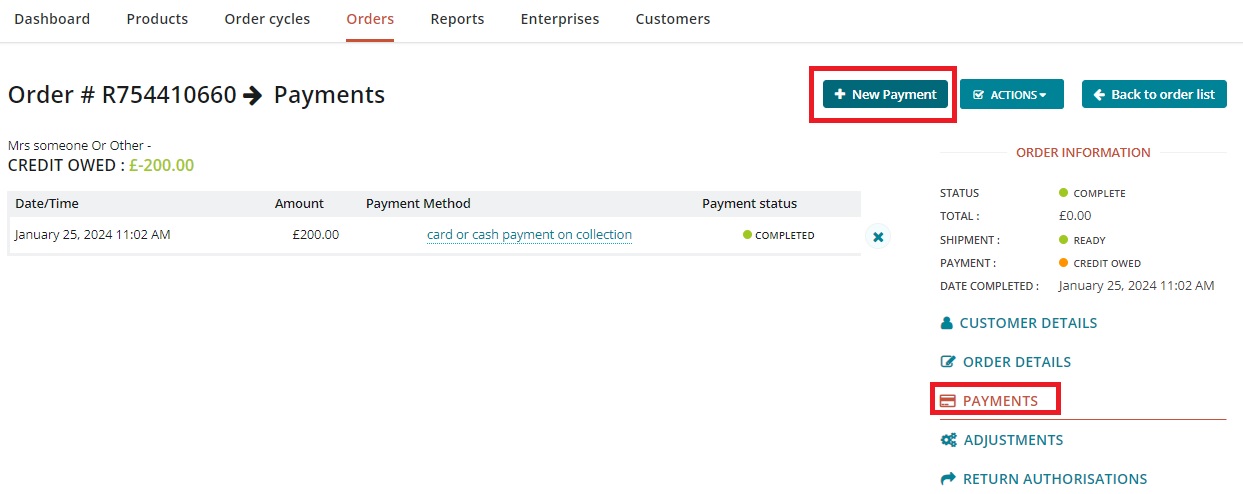
Then choose Payments from the right side menu. Choose New Payment from the top right menu.
Enter the amount of the order paid that has been 'paid by credit' preceded with a minus sign (i.e. -£5.70) and choose ‘Pay by Credit’, then ‘Update’.
‘Capture’ that payment with the green check mark.
Now the ‘credit owed’ has been reduced by the correct amount on the credit order.
And the balance is correct in your customer list.
And the Delivery Report will show the up-to-date balance for the customer. The 2nd order has been paid (so it is no longer negative) and the credit or positive balance has been reduced.
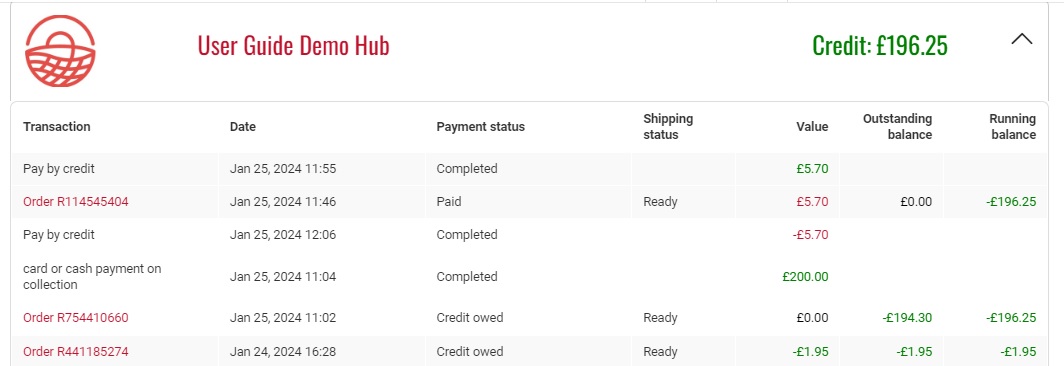
And, finally, when the customer logs into their account the running balance and credit amount will be accurate.
Before we cover different hints and tips on how to offer sub sets of customers differential pricing or benefits, it is worth noting that there are two primary ways in which this functionality can be achieved on the OFN platform:
Both features have their benefits and disadvantages. Hence it is balancing all this information, to work out the 'right' method which would allow your enterprise to achieve the desired outcome.
It is worth noting that the Voucher Feature is beta at present and still undergoing development. The scope of vouchers may increase in the future.
Shopper does not have to be a registered member of the OFN platform nor a customer of your online shop to use the discount offered by a voucher.
Shopper must have an OFN account, and as enterprise owner/admin, you will need to have added a tag to their customer information for your shop for them to be able to access any offer.
A shopper can take advantage of one voucher only per shop. For example, if you offer volunteers 10% off their regular shopping my a voucher code but then a volunteer also is given a £10 off voucher for their birthday then they would have to pay full price for their shopping when redeeming their birthday £10 off voucher.
A shopper can have multiple tags and hence take advantage of lots of benefits if desired. For example, an elderly shopper may be eligible for a 10% off their regular shop via a 'Caring' tag as well as spend a £10 gift voucher purchased by their son as a Christmas gift.
Vouchers have no expiry date. Hence a voucher is not single use. If you issue a £10 gift voucher then you must deactivate the voucher once spent else the customer could use it repeatedly (and hence end up with much more than £10 worth of free shopping!)
Tags have no expiry date. Hence a discount offered under a tag rule is not single use. If you issue a £10 off discount via a tagged negative payment method fee then you must deactivate the tag and/or tag rule once spent it else the customer could use it repeatedly (and hence end up with much more than £10 worth of free shopping!)
Vouchers can only be used to give customers money off ('Flat rate') or a percentage discount from their shopping. They can not be used to offer other benefits such as free delivery, differential pricing for specific products, etc.
Tags and tag rules are highly flexible and can be used to create a host of customer specific benefits- Free delivery, differential pricing for specific products, and more...
Therefore we suggest the following to achieve these functionalities:
Vouchers can not be redeemed against shipping methods.
Volunteers are likely to be existing customers and so the overhead of setting them up with a tag is less involved. They will be willing to log in to their OFN account to shop too! Prevents a discount code being published on the internet and shared/used by shoppers who are not volunteers PLUS they can also take advantage of a birthday/Christmas gift voucher too!
You wish to attract new customers and so, by making a discount voucher code publicly available for a limited time period you will attract the most people.
The recipient may not be a current customer of you shop and the voucher code is more accessible than using tags.
Often as a hub manager you may setup an enterprise on behalf of one of your potential suppliers. Sometimes suppliers may change their mind and decide not to register on OFN and sell through your hub. This is a shame but hopefully they will change their minds in the future!
In the meantime their enterprise will be listed in your Enterprise list and may be confusing for you. To delete the Enterprise you will need to contact your local OFN support team.
Currently users are unable to delete enterprises themselves although it is a functionality that OFN would like to implement in the future.
The OFN team recognise that there is a huge number of aspects to running a food enterprise, using the OFN platform efficiently being one of them. Hence, in this section, as well as a series of platform-based How to's we aim to build a set of resources (including around marketing and social media) for you to turn to for advice.
This section is under development. Please contact your local OFN support team to let them know areas where you would like to have more support.
In this section, we seek to show by a series of step-by-step examples how you can combine different features of the OFN platform to operate your business in exactly the way that suites you.
This list is not exhaustive and may not cover your specific scenario. Remember you can always get in touch with your local instance support team for more guidance or seek advice from peers in instance specific community forums, user Facebook Groups etc.
We recommend using the Voucher functionality of the platform if you wish to offer Gift Vouchers for sale through your OFN shop front.
The advantages of voucher codes are:
There's no need for shoppers to have an OFN account or be existing customers of your shop.
They are easy for customers to use and easy for hub managers to facilitate.
Limitations which you need to be aware of before starting:
Voucher codes have no expiry date and so you will need to remember to log into your OFN account and deactivate the voucher when it has been redeemed to prevent multiple uses.
A voucher code is not specific to a customer and hence if it is shared then it could be redeemed by someone who is not the intended recipient of the gift.
Voucher balances are not adjusted after purchases (ie. if a customer spends less than the voucher value then the remaining balance will be lost (when the voucher is deactivated)).
Gift vouchers are always popular around Christmas and other seasonal events- they are a 'go to' option for many if you don't know exactly what the recipient would like. They can also make very thoughtful gifts for those who are perhaps struggling with household budgets.
You may well find not only that friends and family members of regular and loyal customers of your food enterprise will want to purchase them your gift vouchers for special events, but these customers themselves may want to purchase them and give to their friends (whereby introducing new people to your shop).
This is a THREE-step process:
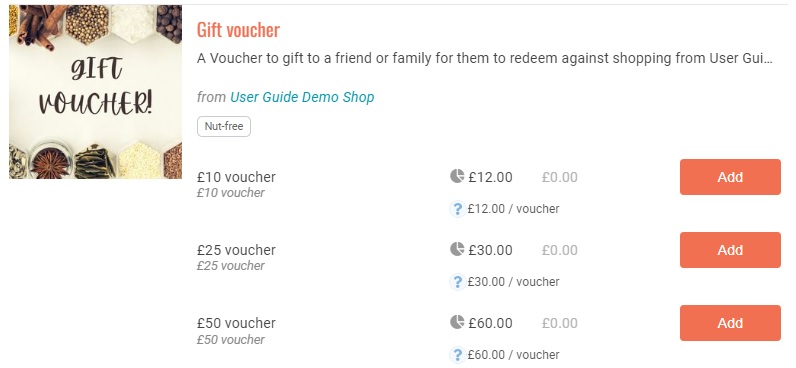
(Optional) Offer gift vouchers for sale on the OFN platform by your shop front.
After a gift has been purchased, create the voucher.
Deactivate the gift voucher when spent.
If you have active OFN 'Flat rate' gift vouchers in your OFN enterprise then we strongly recommend checking through your orders as they come in, to spot when the vouchers have been redeemed (and hence swiftly deactivate them before they are potentially misused).
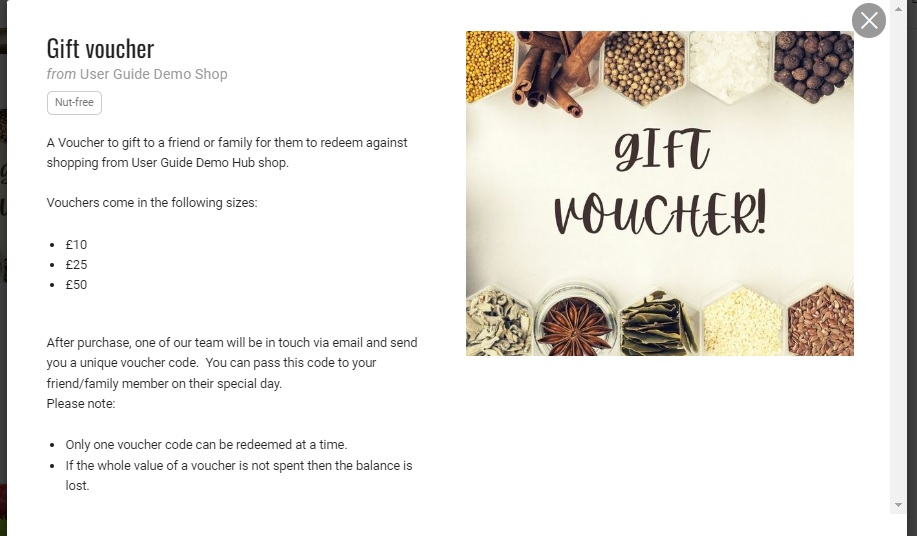
Create a product listing for vouchers. We suggest that you keep it simple ie. having a maximum of three different denominations of voucher only (£10, £25, £50).
Remember:
To include instructions to the customer on how they will receive the voucher code. You will collect the email address of the customer during the order process but not the gift recipient. You could opt for an additional step whereby you email the customer and ask them if they have the email address of the gift voucher recipient and date they would like the voucher sent, but you will need to ensure you keep within the limits of data protection during this process.
It is best practice (as in not to cause later disappointment) to inform the customer of the voucher limitations (one code per purchase and that voucher balances are not carried over if the full value is not redeemed).
That enterprise fees are included in the price of the voucher. The person who redeems the voucher will also have the enterprise fee added onto the products they purchase (ie. fees will be collected twice). The extra enterprise fee may be necessary to cover the added overheads of admin work, processing gift vouchers. Alternatively the product price can be adjusted so that the customer facing price (product price + fee) is the voucher’s value.
You may wish to consider creating a paper voucher with the unique code written on each one.
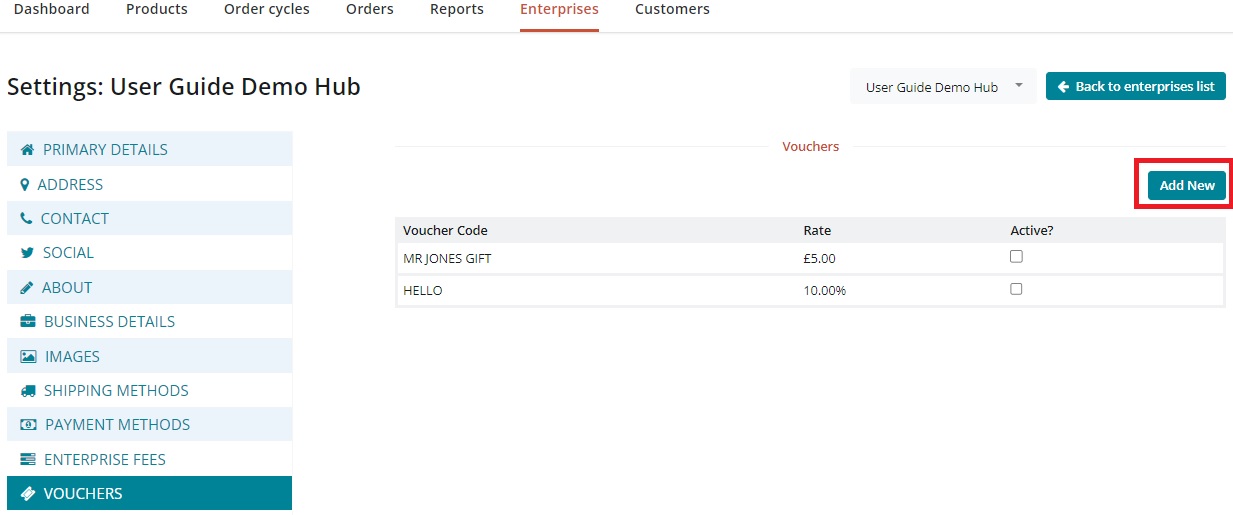
Create a new voucher by visiting Enterprises -> Settings -> Vouchers and selecting Add New
Complete the form: Voucher Code: Choose a unique string. We suggest adding special characters and perhaps dates or numbers to prevent vouchers being misused. Voucher Type: Flat Amount: monetary value of the gift voucher purchased.
Inform the person who purchased the gift voucher of their voucher code by email or print them a gift voucher with this code on it for them to pass on to the recipient of their gift.
Check through orders as you receive them to see if and when customers use vouchers as part (or full) payments for their shopping.
Places to look are:
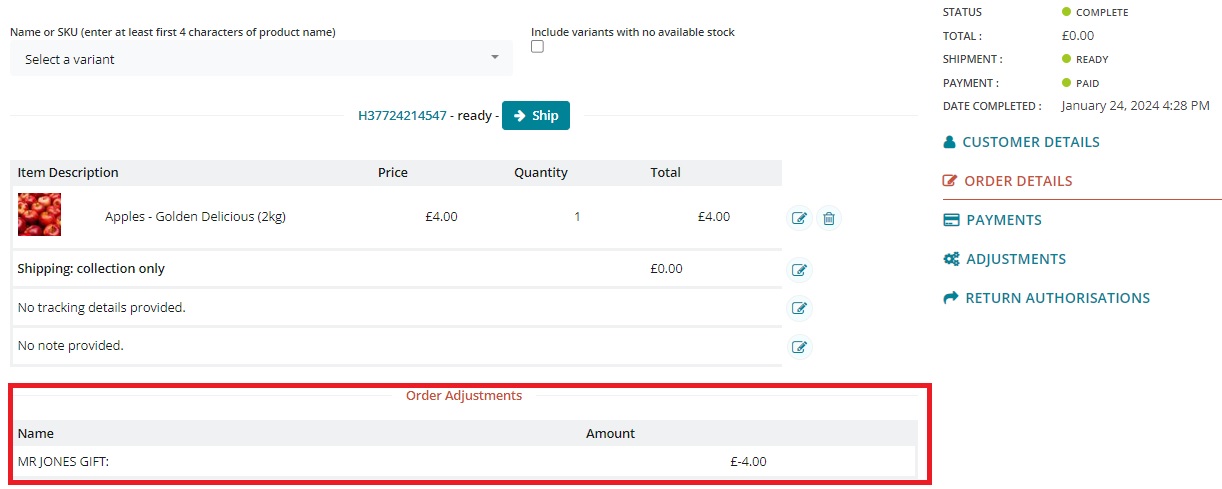
Vouchers display as an Adjustment when you edit an order.
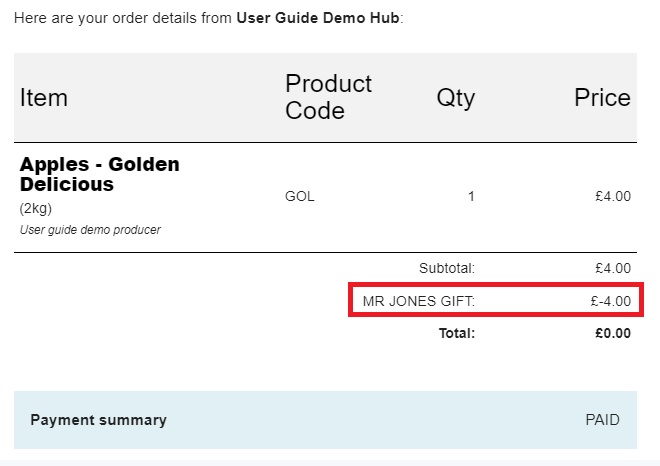
They also appear between the Subtotal and Total lines in order confirmation emails (sent to both the customer and the food enterprise:
There's an option to view Vouchers and voucher codes used when viewing or downloading all varieties of Order Cycle Totals reports.
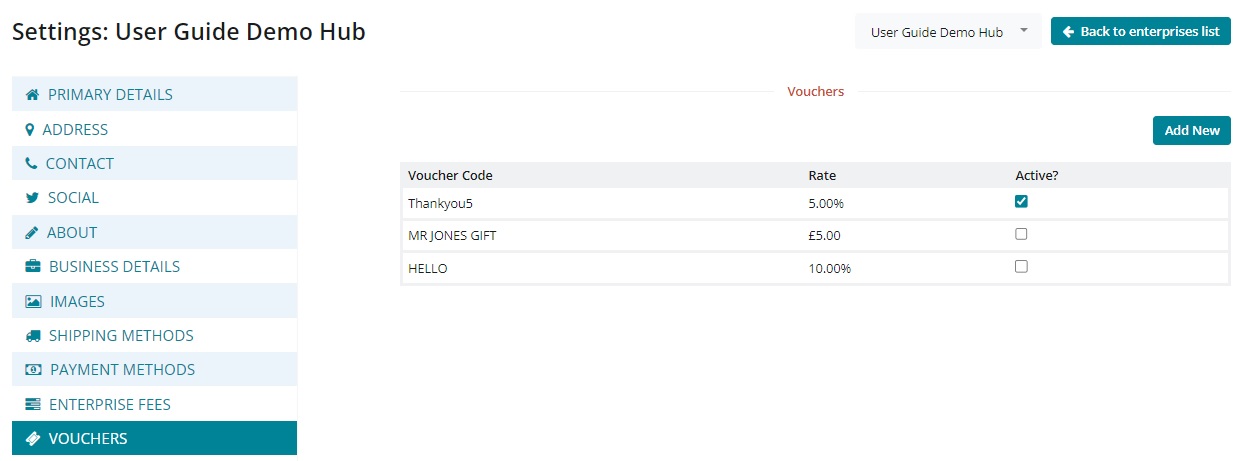
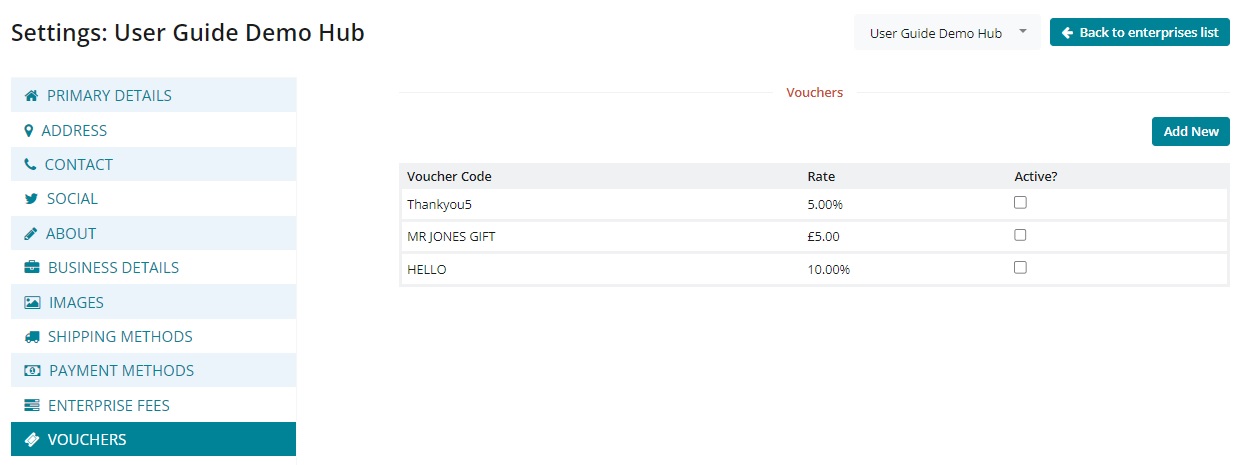
When you notice a voucher has been redeemed then you need to visit your list of Vouchers (Enterprises -> Settings -> Vouchers) and deactivate it, by changing the check box to the right from ticked to unticked.
Active:
Deactivated:
We recommend using the Voucher functionality of the platform if you wish to offer a discount code to all customers via a social media campaign.
The advantages of voucher codes are:
There's no need for shoppers to have an OFN account or be existing customers of your shop.
They are easy for customers to use and easy for hub managers to facilitate.
Limitations which you need to be aware of before starting:
Voucher codes have no expiry date and so you will need to remember to log into your OFN account and deactivate the voucher at the end of the promotional period to prevent it being used continuously.
Only one voucher code can be redeemed at a time. Hence a customer wishing to spend their uniquely-coded money-off gift voucher for your food hub will not be able to redeem it alongside this type of percentage discount social media voucher.
It is not possible to state a minimum spend alongside the voucher code.
Vouchers can only be redeemed against shopping and not against the cost of shipping.
To retain loyal customers and/or attract new ones you may from time to time like to run a social media promotion. For example, you might post on Facebook and Instagram that for all orders received in the coming week customers can claim a 5% discount on their shopping with a specific voucher code.
As well as potentially encouraging a higher basket spend during a 'lean' shopping period (for example, after Christmas), these type of social media campaigns can attract new social followers and increase your social media presence. All this is good for building a strong and sustainable food hub community.
Below is a step-by-step guide to implementing the above example. The process relies on the highly flexible Tag and Tag rules facility on the OFN platform. At the end of this page are tips on how to adapt this promotional offer.
This is a TWO step process:
Create a voucher and publish on social media.
At the end of the promotional period, deactivate the voucher code.
Create a new voucher by visiting: Enterprises -> Settings -> Vouchers and selecting + Add New
Fill out the options as follows: Voucher Code: Opt for something simple without spaces or special characters. Voucher Type: Percentage Amount: the percentage discount you are offering.
Save the voucher- it will now be live.
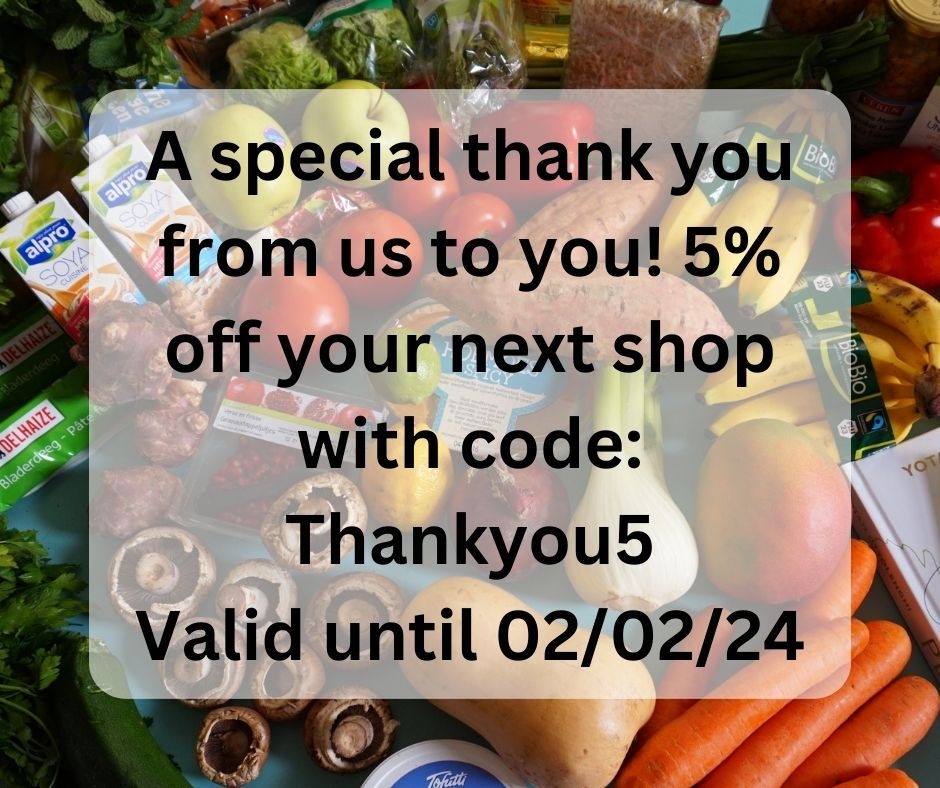
Create your social media posts and publish. An example might be:
Set a very important reminder on your phone or in a calendar to deactivate the voucher on the promotion end date.
Customer's view at checkout:
On the day you would like your social media promotion to end, visit Enterprises -> Settings -> Vouchers. With the voucher active it will appear as:
Deactivate by de-selecting the tick box next to the relevant code and saving your changes.
This functionality is best achieved using the Tags and Tag Rules feature of the platform.
As a hub manager you may often be asked by your suppliers to see what their products look like on your shop front before the order cycle goes 'live' to customers. Suppliers may wish to tweak their listings- change a photo or add to their product descriptions for example. This is especially common in the early days (weeks and months) of a new hub.
The process below outlines how to implement a 'Preview' Order Cycle. It draws on the highly flexible feature of Tag and Tag Rules on the OFN platform.
Your enterprise will need to be listed as a Hub on the OFN platform to add a tag to order cycles.
This is a TWO step process:
Opening an Order Cycle which only you and suppliers can view.
Removing the tag which facilitates (1) when the order cycle goes 'live' to customers.
Login to your business OFN account and visit Customers page.
Click + New Customer and add the email addresses of your suppliers. (If they have placed an order with your shop/hub in the past then they will already be a customer of your enterprise and so this step is not necessary.)
In the ‘tags’ column type in ‘producer’ for that customer.
Visit your Order Cycles page.
Set up your next order cycle. Set the opening time as ‘now’ and the closing time your usual closing time.
On page 3 (‘Outgoing Products’) add ‘preview’ into the tag section:
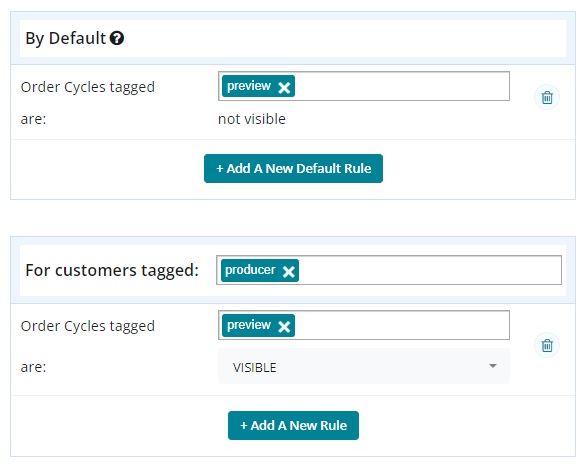
Visit your Enterprise -> Settings page and select ‘Tag Rules’ from the left hand menu. Set up the following Tag rules: Default: Order Cycles tagged ‘preview’ are not visible. For Customers tagged ‘producer’, Order Cycles tagged ‘preview’ are visible.
Bingo! Your order cycle is now open for your producers to view their products on your shop front but general customers will not be able to view (or shop).
Producers/suppliers can make purchases during this time
Set a reminder on your phone/calendar to edit your order cycles at the time and day you wish shopping to commence.
At this time visit your order cycles and select ‘Edit’ next to the one you wish to make ‘live’ to customers:
Visit ‘Outgoing Products’ section on page 3 and remove the tag:
All your customers will be able to view your shop and make purchases now!
This functionality can be achieved using either the Voucher or Tags and Tag Rules features of the platform.
We recommend using the Tags and Tag Rules feature here for the following reasons:
Volunteers are often already customers of your shop and so setting the tags up is more straight forward in their case than it for members of the public.
It prevents a discount voucher code being published and shared online where it could be used by non-volunteers to get money off their shopping. Equally, if a volunteer stops helping then the tag can be easily removed for them without having to re-issue all your volunteers with a new voucher discount code.
Only one voucher can be redeemed at a time. By offering volunteers a discount using tags, they will also be able to redeem a voucher on their reduced price shopping which may be gifted to them at Christmas or birthday by friend/family.
Would you like to say a little thank you to the people who help run your community food enterprise? One option is to allow staff and volunteers to have a small discount off any shopping they do. Below is a step-by-step guide on how to implement this. The process draws on the highly flexible Customer Management tools available using Tags and Tag Rules.
Ask your volunteers to let you know the email address linked to their OFN account.
Login to your business OFN account and visit Customers page.
Use the ‘Quick Search’ box to identify if the person has shopped with you before.
If their email address doesn’t appear then click + New Customer and add their address.
Add the tag ‘volunteer’ to the customer’s entry.
Visit Enterprises -> Settings and then select ‘Payment Methods’ from the left hand menu.
Click + New Payment Method.
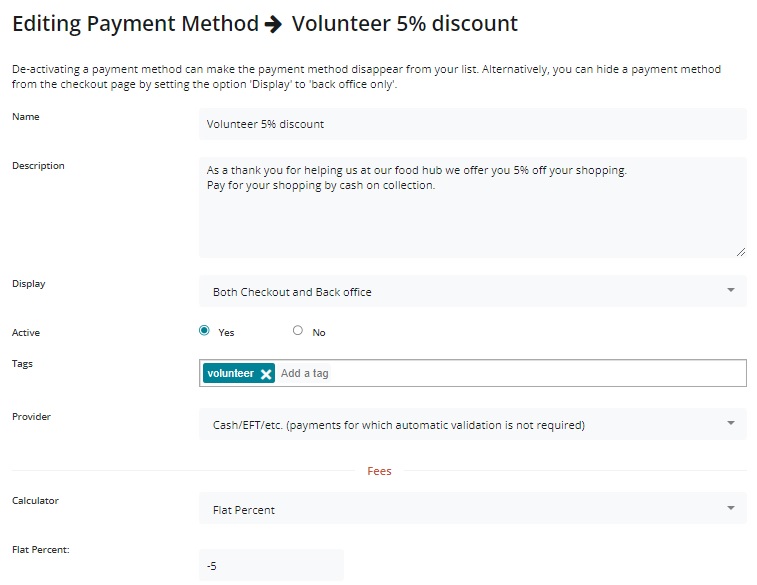
Name: Volunteer 5% Discount Description: Thank you for helping us run our local food hub. Display: Both Checkout and Back Office Active: yes Tags: Add the tag ‘volunteer’ into this space. Provider: choose the most appropriate method for your business. Fee Calculator: Flat Percent
After selecting Create, add ‘-5’ * to the ‘Amount’ field of the ‘Fee Calculator’ Section. (Negative sign results in a discount) *-5 will result in a 5% discount if your enterprise does not use Enterprise Fees.
All percentage fees are calculated on a percentage of product costs only.
If your business adds a flat percent Enterprise Fee to all products then the amount you need to enter into the 'Flat Percent' field for this discount payment method is:
eg. for a business with an enterprise fee of 20% who would like to offer a 5% discount to volunteers, the amount to enter in the flat percent of this payment method is:
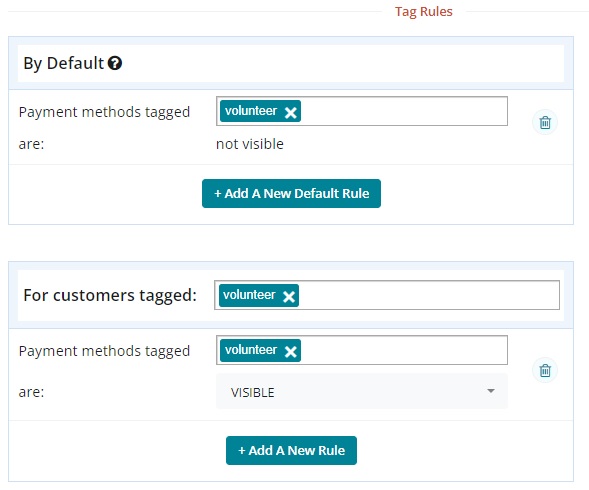
Visit your Enterprise -> Settings page and select ‘Tag Rules’ from the left hand menu. Set up the following Tag rules:
Default: Payment Methods tagged ‘volunteer’ are not visible. For customers tagged ‘volunteer’ payment methods tagged ‘volunteer’ are visible.
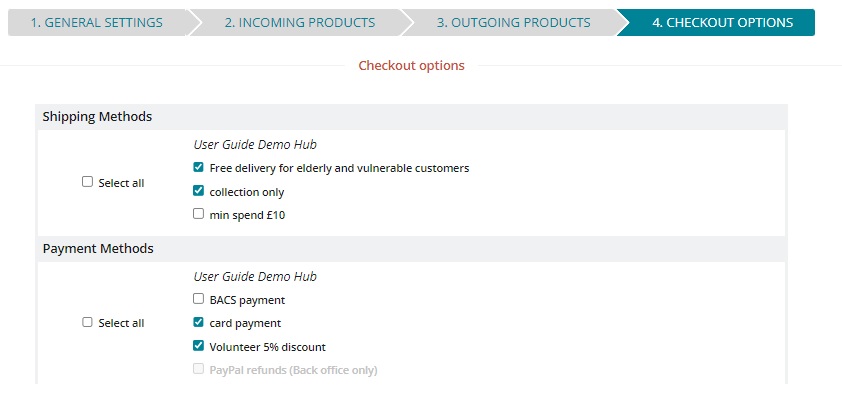
When you open an order cycle, ensure to select at least two payment methods on Page 4, under 'Checkout Options' - the tagged payment method which offers volunteers a discount and an un-tagged method visible for all customers.
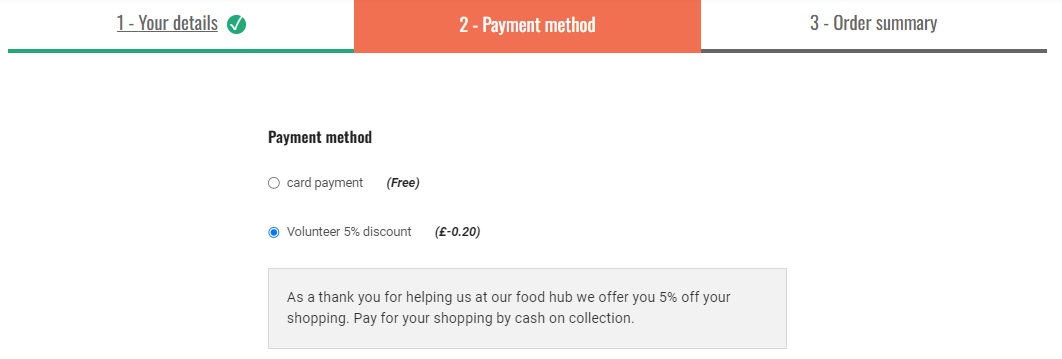
At checkout, this is an example of what a volunteer will view (when logged into their OFN account):
This functionality is best achieved using the Tags and Tag Rules feature of the platform.
The outbreak of COVID-19 in March 2020 saw a wave of panic buying by consumers prior to (or in the early days of) national 'lockdowns'. This left vulnerable groups and key workers short of food.
Below is a step-by-step guide to enable selected customers (you may choose as a business for this to just be people you know to be over 80 years or perhaps include key workers as well) to shop before others and hence get the first choice of products (should they run out later in your order cycle).
The process uses the Customer Management feature which is described in full here.
Your enterprise will need to be registered as a Hub on the OFN platform to add tags to Order Cycles, as described below.
The process is much the same as that you would use for opening your shop early on 'Preview' but only this time you make the shop visible to a different subset of customer.
Set up a policy as a business on which group(s) you would like to offer this service to.
Keep a record of the customer’s name and the email address linked to their OFN account.
Use the ‘Quick Search’ box to identify if the person has shopped with you before.
If their email address doesn’t appear then click + New Customer and add their address.
In the ‘tags’ column type in ‘priority’ for that customer.
Step One: Before the order cycle opens
Visit your Order Cycles page. Set up your next order cycle as you normally would, setting the opening time to be one hour (or more) before that you would like it to be open to all customers.
On page 3 of the order cycle add ‘priority’ into the tags section:
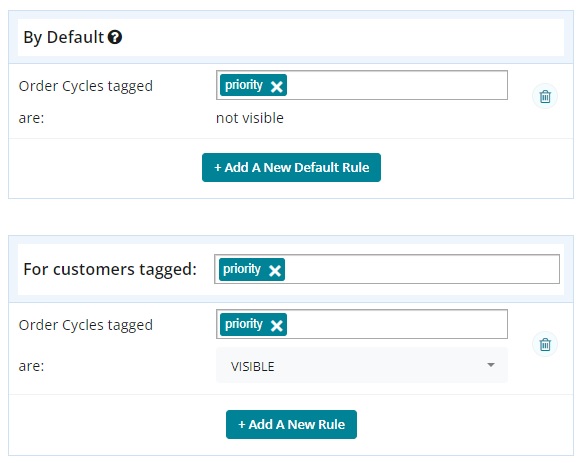
Visit your Enterprise -> Settings page and select ‘Tag Rules’ from the left hand menu. Set up the following Tag rules:
Default: Order Cycles tagged ‘priority’ are not visible. For Customers tagged ‘priority’, Order Cycles tagged ‘priority’ are visible.
Step Two: On the day of the order cycle
Set a reminder on your phone or in a calendar at the time of day which you wish your shop front to be visible to all your customers.
At this time, log into the OFN platform and edit the order cycle which is currently only open for priority customers.
Visit Page 3 'Outgoing Products' and remove the tag. Remember to save your changes.
Your shop front will now be visible for all your customers to view and purchase from.
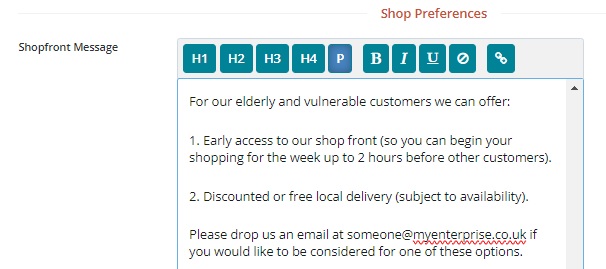
Don’t forget to edit your ‘Shopfront Message’ (found from Enterprises -> Settings -> Shop Preferences) to invite new elderly/vulnerable/keyworker customers to contact you so they can be prioritised.
This functionality is best achieved using the Tags and Tag Rules feature of the platform.
It’s always really disappointing if your supplier has spent time and resources to prepare goods for a customer and then they don’t arrive to collect their shopping. This is especially a risk when payment is not taken up front for goods.
Using Stripe (card payment) or PayPal businesses can automatically collect payment from their shoppers at the time of checkout using the OFN platform. These card payment methods may not suit all your customers though: some people are afraid of online payments, some may not have a bank account and others might use cash as a way of keeping track of their weekly budgets.
As a manager of a local food enterprise you are in tune with your customers’ needs. You might like the majority of your customers to pay by card (less admin time for you to chase/collect payments by BACS or cash, peace of mind that you have payment upfront for goods rather than waiting for the day of collection …. etc) but allow a small selection who you know and trust to pay by cash or BACS. You can use Tags and Tag Rules to implement this as described below.
Set up a Stripe (or PayPal) payment method which will be your only option for the majority of shoppers. (Visit Enterprises -> Settings -> Payment Method and ‘Create New Payment Method+’. See this guide for more information.)
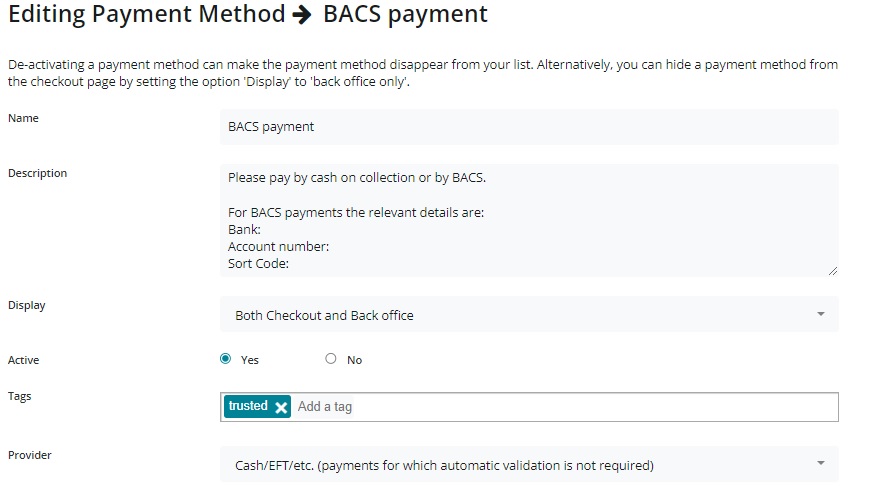
Create a second payment method with the following settings: Name: ‘Cash or BACS payment’ Description: provide relevant details here such as bank information required for a trusted customer to make direct payment to your bank account Display: Both checkout and back office Active: yes Tags: ‘trusted’ Provider: Cash/EFT/etc
Visit your Customers page.
Use the ‘Quick Search’ box to find your regular and trusted customer’s details:
Add the Tag ‘trusted’ to their entry:
Visit Enterprises -> Settings -> Tag Rules and add the following:
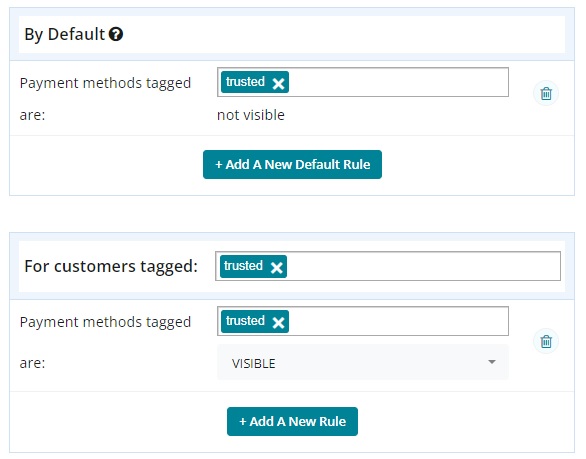
Default: Payment Methods tagged ‘trusted’ are NOT VISIBLE Rule: For Customers tagged ‘trusted’ Payment Methods tagged ‘trusted’ are visible.
When you open an order cycle, on page 4 'Checkout Options' select at least one automatic payment method which is visable for the majority of your customers (Stripe and/or PayPal) as well as the new tagged payment method set up above 'BACS payment'.
Bingo! Only your trusted customers will be offered the choice of payment by cash or BACS.
If you find a customer regularly fails to pay on collection or is repeatedly late with BACS payments then you can always remove this option by deleting the tag ‘trusted’ on their Customer record. The shopper will then only be able to pay by card upfront, like your other customers.
There are a number of ways you can manipulate the appearance of your shop to suite your customer base. These primarily come in two broad groups:
Your overall shop appearance can be customised using the 'White Label' feature of the platform. This is found from visiting Enterprises -> Settings -> White Label.
Currently the two main options you can take advantage of are:
Removing OFN branding (highlighted in red below)
Customising menu tabs on your shop front (highlighted in green below)
While for some enterprises being a member of the OFN family is part of their food enterprise's story, for others it can be confusing- especially for customers. (For instance, a customer may think they placed an order with OFN and hence get in touch with your local OFN support team asking to cancel or add items, rather than contacting you directly.)
By visiting the White Label menu via your Enterprise settings, the first option ('Hide OFN navigation') allows you to manipulate which part of the OFN branding you would like to remove.
To just remove the top menu (highlighted above in red) then simply check the box as below but do not add an alternative logo for your organisation.
Your shop front will now appear as:
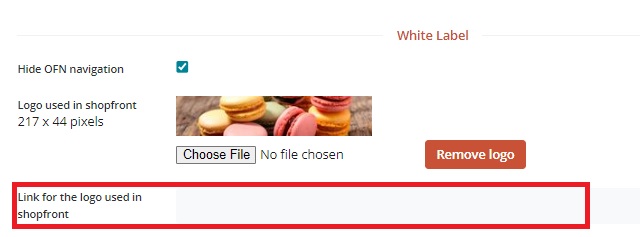
Uploading a new image to replace the top right-hand OFN logo will also allow you to add a custom link to an external website. The OFN logo at the top of your shop front will, for most instances, link to their main OFN landing page. You may have a website which tells your food hub story etc. It would, therefore, perhaps be good to direct customers to this.
The option to add a hyperlink will only become available after an image has been uploaded and saved.
Your edited shop front will now appear as:
The standard menu tabs which will appear under your shop name, logo and location are:
Notices: This will only be visible if you have entered text into the Shopfront Message and Shopfront Closed Message found under Enterprise -> Settings -> Shop Preferences.
Shop: This is only visible for enterprises listed as Producer Shops or Hubs.
About: This is visible for all enterprises. The image and text can be edited from Enterprise -> Settings -> Images/About respectively.
Producers: This is a list of all the producers with whom you share enterprise permissions which means your shop front can retail their products.
Contact Us: This is visible for all enterprises. The image and text can be edited from Enterprise -> Settings -> Address/Contact/Social.
Groups: If your food enterprise is part of a larger group on the OFN network then this tab will be visible. You can opt to remove it using the White Label feature.
Those highlighted above in red will be visible for all enterprises and can not, at present, be removed. Those in green can be removed.
Under the White Label feature, you can opt to hide the Groups tab from your shop front.
This might be helpful if all the other food enterprises which are in the same group as yours are dispersed across the country and hence not accessible to your customers.
For organisations who offer more than food retail but perhaps don't have another external website, this option allows you to give customers more information about your food enterprise. For example, you may wish to use the tab to recruit volunteers to help with packing and distributing food orders.
The facility to add this is found under the White Label feature:
Although customers can use the filter and search functions to find the products they are looking for, some shops like to organise their product list to optimise sales.
By default, products will be listed in alphabetical order.
There are two options:
To group products according to their type
To group products according to their producer.
You can choose between the two by visiting Enterprises -> Settings -> Shop Preferences
An example of sorting my categories might look like:
Here you will have all products listed in the category 'Special Offers' first, followed by those in the 'Fruit & veg', 'Bread & Baking' and 'Meat' categories. Any remaining products not in one of these four categories will be found after this.
Note: within each category, the products will be sorted alphabetically and not by producer. So you may have Apples by farmer A, Apples by farmer B... before you get more of farmer A's produce.
An example of sorting by producer may look like:
Here you will have all products made by 'Lemon & Canela' first, followed by those by 'Blackbirds Micro Bakery, 'Sole of Discretion'... and so on. This works well if you have only one primary supplier of each type of product.
Note: for each producer, the products will be sorted alphabetically and not grouped according to category.
The method which is 'right' for your enterprise will be distinct for you. If you find that the big attraction of your food hub for customers is, say, fruit and vegetables, then perhaps it might work well to organise your products by category, with Fruit & Veg first. If on the other hand, a well known and award winning butcher supplies you food hub and is a key attraction then it might work well to organise your products by producer, with this Butcher coming first.
OFN UK have a series of tips and resources on how to set up an effective social media strategy for your food enterprise. These resources can also be found on their Thriving Hubs Facebook group- join the group to access the most up to date information.
Running a food enterprise is about much more than just selling food and documenting/accounting for sales. Marketing your enterprise to your target customer base is key. As well as sending regular emails and newsletters, social media can be an effective (and cost-efficient) way of promoting your business.
This series of documents explains from beginner to expert how to get the best out of social media:
Watch this video on how to improve your social media.
Periodic posts on one social media platform are better for building your audience (or following) than sporadic posts across multiple platforms.
OFN UK have a series of tips and resources on how to set up an effective marketing strategy for your food enterprise. These resources can also be found on their group- join the group to access the most up to date information.
These are some helpful videos:
Master your messaging.
for Marketing Campaigns.
.
This functionality is best achieved using the feature of the platform.
Elderly or vulnerable customers may find it more difficult to reach your hub or shop collection point. Whilst it wouldn't necessarily be possible for you to deliver goods to every customer's doorstep (due to cost, time and distances involved) you may have capacity to help a small number of local 'priority' customers.
Below is a step-by-step guide to enable selected customers to access free (or discounted) delivery.
The process uses the Customer Management feature which is described in .
What is the maximum number of delivery slots you can offer for free/discounted rate?
Which areas would you consider delivering to free of charge or at a discounted rate? For instance, limit the area to a specific postcode/street/district or perhaps to streets on your way home.
Be realistic about the number of deliveries you can make and the cost of petrol/time to make them.
Keep a record of the customer’s name and the email address linked to their OFN account.
Login to your business OFN account and visit .
Use the ‘Quick Search’ box to identify if the person has shopped with you before.
If their email address doesn’t appear then click + New Customer and add their address.
Add the tag ‘free_delivery’ to the customers entry.
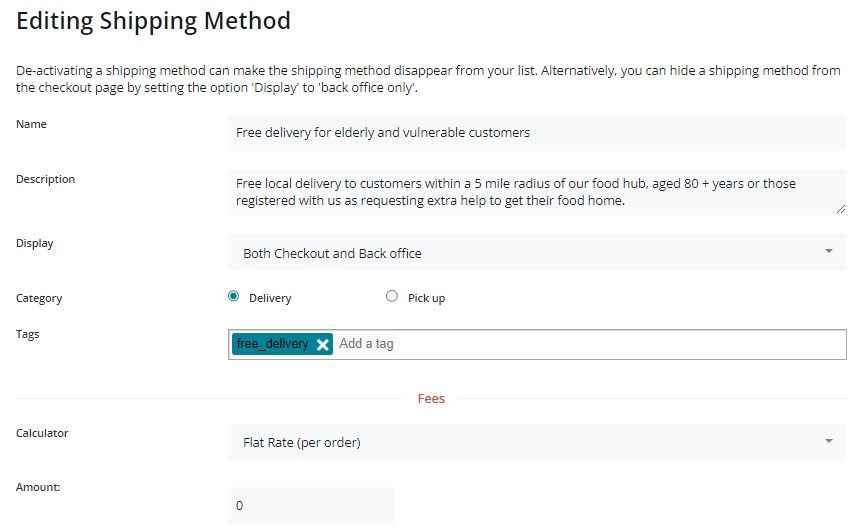
Name: Free local home delivery for elderly and vulnerable customers. Description: Free local delivery to your home address. Display: Both Checkout and Back Office Category: Delivery Tags: Add the tag ‘free_delivery’ into this space. Fee Calculator: Flat Rate amount = 0.00 Categories: Default Zones: UK_VAT
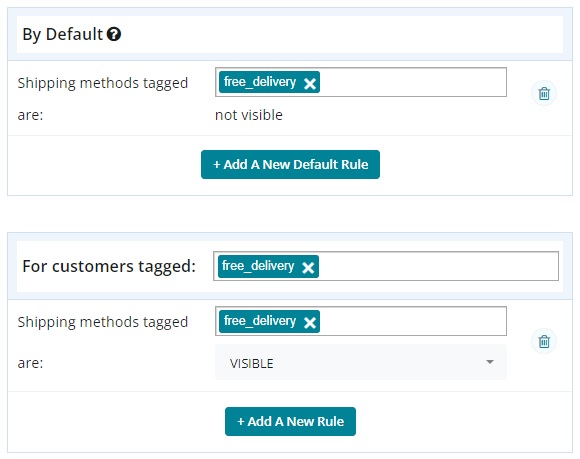
Default: Shipping Methods tagged ‘free_delivery’ are not visible. For Customers tagged ‘free_delivery’, Shipping Methods tagged ‘free_delivery’ are visible.
Open an order cycle and on Page 4 'Checkout Options' select at least one delivery/collection method which will be available to all customers AND the new 'Free delivery for elderly and vulnerable customers' which you set up with a tag above.
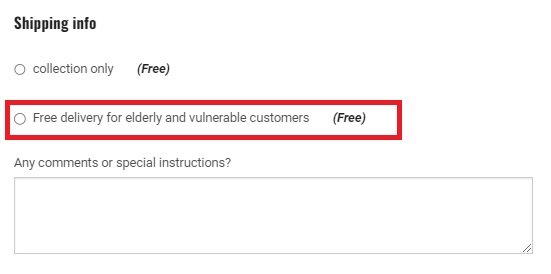
Bingo! A customer who has registered with you as elderly and lives close will be able to view an extra option at checkout compared to all other shoppers:
Add a comment to your standard delivery methods (in the ‘Description box’) to inform elderly and vulnerable customers on how to get in touch and be eligible for free delivery in the future.
Visit Enterprises -> Settings -> and click +New Shipping Method.
Visit your Enterprise -> Settings page and select ‘’ from the left hand menu. Set up the following Tag rules:
Don’t forget to edit your ‘’ (found from Enterprises -> Settings -> Shop Preferences) to invite new elderly/vulnerable/keyworker customers to contact you so they can be prioritised.

